I think almost all of us love eating ice-creams. We eat Popsicle ice-creams (also known as choc-bar ice-cream) and throw the sticks in dustbin.
But, have you ever thought that you can use it to make beautiful photo frames?
Today I’m going to tell you how to make a photo frame from Popsicle ice-cream
sticks.
Things you’ll
need: 1) Popsicle ice-cream
sticks (at least 4 for a simple square shaped frame. You may need more for
different shapes)
2) Poster color
3) Instant glue (like super glue)
4)
Cardboard or hard paper
5) Scissors
6) Pencil
7) Ruler
8) Paper
9) Objects for decoration according to
your theme of the photo
10) Transparent plastic sheet for
protecting the photo from dust and humidity)
11) A photo that you want to frame
Step-1: Think
about the shape and color of your photo frame. Use your imagination power. I’ll recommend a simple square
shape for the beginners as it’s the easiest shape to create. You can make
different shapes once you have practiced and become an expert. I found a photo
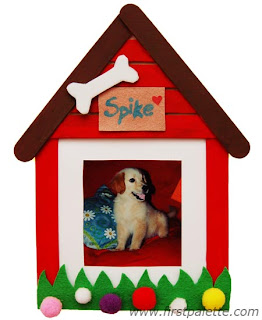
frame in a website that looked like a doggy house which was pretty cool. Think how many
sticks you’ll need to make it. It takes 4 to make a square. You have to add
more sticks at sides if you want to make the outline broader.
Step-2:
Wash the Popsicle sticks with water and dry them. Color the sticks with poster
color as you designed in mind and dry them properly.
Step-3: Set
the sticks as your design on a smooth flat surface. For making a square place
two sticks paralleled. Place two more parallel sticks on two ends of them to
creating a square. Add a stick beside each stick if you want to make the frame
broader. But whatever is the shape of your frame, make sure each end of the sticks
should join with at least one stick. The sticks should join in a way that one
end should be on top of the other, so that you can glue them each other
properly. No ends should be open and unglued. Sometimes you’ll need to cut the
sticks in a smaller size according to your design. But you don’t need to cut
the sticks to make a square.
Step-4: Now
carefully use instant glue to attach the sticks according to your design. You
need to be careful that you don’t spoil your design. Because instant glue can
attach sticks in seconds and you won’t be able to separate the sticks after
gluing. Now dry the whole structure properly.
Step-5: Place
your photo frame structure on the cardboard or a hard paper. Draw the outline
of the structure on the cardboard using a pencil. Take the structure away and
draw a smaller outline inside the previous outline. The distance between two
outlines should not exceed the half of the width of a Popsicle stick. Cut the
cardboard using scissors according to the smaller outline. Now cover the
cardboard with paper using glue. You can use white or colorful paper as your
wish, but when using colorful paper choose color according to your design.
Otherwise it will make the whole thing look worse.
Step-6: Take
the cardboard. Place the photo on the center of it and then place the stick
made structure on it. If you can see that the photo is larger than the card
board, then cut and reshape the photo to fit it in the frame.
Step-7: Now
attach the photo carefully on the cardboard using glue. Make sure that any part
of it is not outside the cardboard. Dry it properly.
Step-8(this step
is optional): Take the
transparent plastic sheet. Cut the sheet according to the shape of the
cardboard. Put instant glue on the sides of the sheet and attach it on the
cardboard carefully covering the photo. Make sure any part of the plastic sheet
is not outside the cardboard. Be careful not to wrinkle the plastic. Dry it.
Step-9: Glue
the stick made structure on the card board. Your photo frame is almost ready! But
you still need something to support it for standing. To make a supporting flap,
draw a rectangle approximately 4 inch long and 1 inch wide. Cut it out. Fold 1
inch from the end of the rectangle to make a surface for gluing. Put instant
glue on the folded part and glue it with the back of the cardboard to make a
flap. Dry it. Now the photo frame is ready. But don’t you think that we need
some decoration?
Step-10: For
decorating the frame use objects as your wish. But the object should not be so
big that it covers the photo. Try to create a theme according to the photo. It will
make the frame look cool with the photo. For example: the photo is about a sea
beach. Then you can use seashells, small plastic starfish etc. if the photo
presents someone’s birthday, then you can use hard paper to make little cake,
candles, balloons, gifts etc. (Draw them on the paper, color them and cut out
from paper). Be creative. Use your world of imagination. If you want write
something on the frame, use glitter or poster color. But choose the colors
according to your design. Then dry it. Once you have collected or prepared the
decoration objects it’s time for gluing. Attach the objects according to your
design using instant glue. Dry it.
Now you have created a beautiful photo frame. You can use it
for yourself or gift it to anybody. It’s a perfect gift for everyone.


its nice craft and very useful to all.
ReplyDelete